
As cyber threats continue to evolve, ensuring robust security measures for your server is crucial. Cloudflare and Fail2Ban are two powerful tools that, when combined, can provide an added layer of protection against malicious attacks and unauthorized access. In this article, we'll explore how to integrate Cloudflare with Fail2Ban to bolster your server's security.
Note: this article assumes you already have experience with both products. Having Fail2Ban installed and functioning already is paramount. This article simply allows you to also block the offending IP Address at Cloudflare's network, across all your domains, across all your Cloudflare accounts. Blocking at the network level is so much better than letting the offending IP address reach your server.
Understanding Cloudflare and Fail2Ban
Cloudflare
Cloudflare is a popular Content Delivery Network (CDN) and Distributed Denial of Service (DDoS) protection service. It acts as a reverse proxy, routing website traffic through its global network of data centers, which helps to improve website performance and mitigate DDoS attacks.
Fail2Ban
Fail2Ban is an intrusion prevention software that scans log files for suspicious patterns of activity, such as multiple failed login attempts, and dynamically updates firewall rules to block the offending IP addresses. By doing so, Fail2Ban helps protect your server from brute-force attacks and other malicious activities.
Integrating Cloudflare with Fail2Ban
The integration between Cloudflare and Fail2Ban will enable you to block malicious traffic at the Cloudflare level based on Fail2Ban's ban list. This way, malicious traffic is prevented from even reaching your server.
To achieve this, we'll use the Cloudflare API to update the Firewall Rules whenever Fail2Ban adds an IP address to its ban list.
Obtaining a new Cloudflare API Token
First, you'll need to obtain your Cloudflare API token. Log in to your Cloudflare account, navigate to "My Profile," and then the "API Tokens" tab. Generate a new token with "Edit" and "Read" permissions for "Account Firewall Access Tools" rules by creating a new Custom Token:
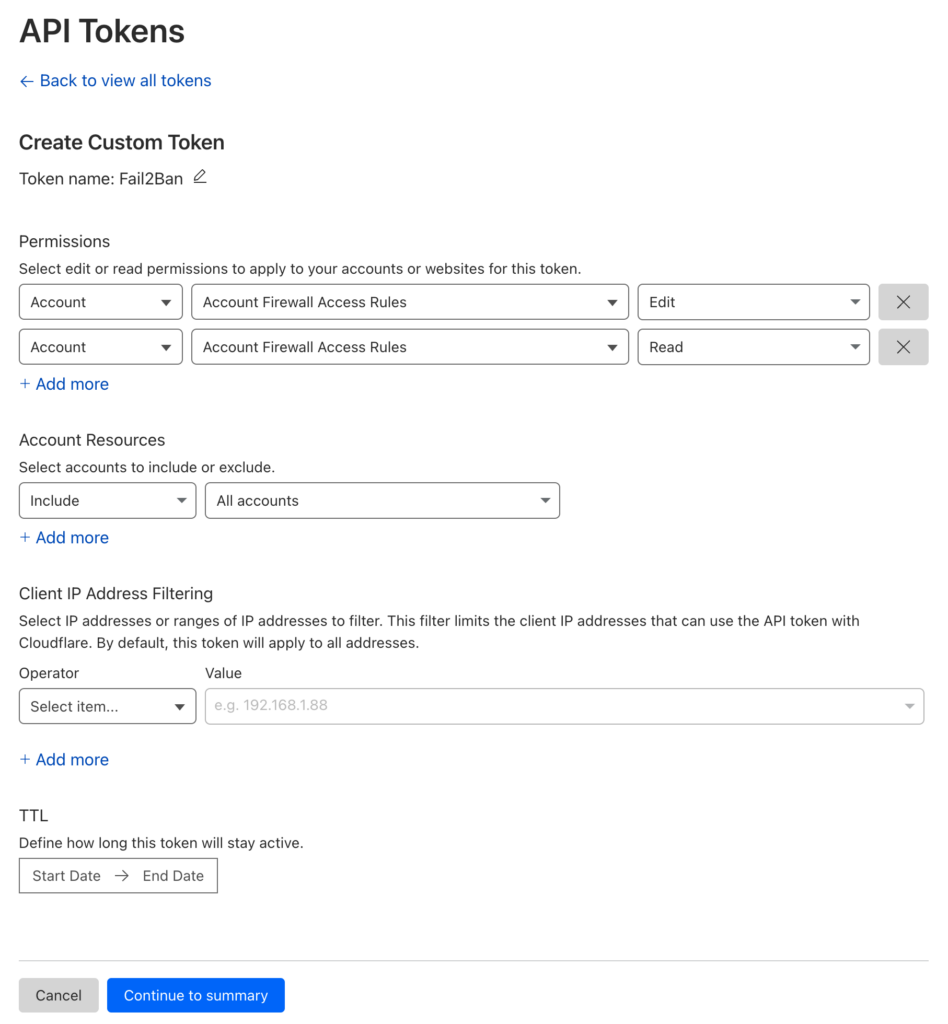
Once your API Token has been generated and provided on screen, note this down as we'll need it later.
How to install Fail2Ban on Ubuntu/Debian
How many IP's can I block at Cloudflare?
Does this block Cloudflare's own IP address?
Creating a Cloudflare Action Script
A Fail2Ban action script is a script that defines the actions to be taken when a specific event occurs, such as banning or unbanning an IP address. These scripts are written in a format specified by Fail2Ban and can execute commands or API calls to enforce the desired actions.
Next, we need to create a custom Fail2Ban action script to interact with the Cloudflare API. Create a new file called cf-api.conf in the actions directory:
Note: your actions directory is most probably located at /etc/fail2ban/action.d/, so create the new file at /etc/fail2ban/action.d/cf-api.conf and enter the following contents:
[Definition]
actionban = curl -s -X POST <_cf_hdr> <_cf_url> \
            --data '{"mode":"block","configuration":{"target":"ip","value":"<ip>"},"notes":"Fail2Ban <name>"}'

actionunban = id=$(curl -s -X GET <_cf_hdr> "<_cf_url>?mode=block&configuration_target=ip&configuration_value=<ip>&page=1&per_page=1" | jq -r .result[0].id)
            if [ -z "$id" ]; then echo "<name>: id for <ip> cannot be found"; exit 0; fi; \
            curl -s -o /dev/null -X DELETE <_cf_hdr> "<_cf_url>/$id"

_cf_url = "https://api.cloudflare.com/client/v4/user/firewall/access_rules/rules"
_cf_hdr = -H "Authorization: Bearer YOUR_CLOUDFLARE_API_TOKEN" -H "Content-Type: application/json"
Replace YOUR_CLOUDFLARE_API_TOKEN with the Cloudflare API Token you noted down before. Save and close the file.
Adding the action to a Fail2Ban filter
A Fail2Ban filter is a configuration file that specifies the pattern or regex (regular expression) used to identify specific events or entries in log files. Fail2Ban scans log files to detect suspicious activities or patterns, such as failed login attempts or unauthorized access, and applies corresponding actions, such as banning IP addresses. These filters are typically stored in the
/etc/fail2ban/filter.d/directory.
You must have at least least one filter enabled first before you can add an action to it. By default, a filter will probably have iptables as the action variable.
You can find the configuration for enabled filters in the file /etc/fail2ban/jail.local
The example below shows you the SSH filter enabled. In this example, we've also added our Cloudflare action to the configuration by simply appending cf-api (the name of our action file without the .conf extension) to the action variable:
[sshd]
enabled = true
logpath = /var/log/auth.log
maxretry = 2
port = 22
action = iptables
         cf-api
You will need to modify this for SSH and any other filters that are enabled that you want Cloudflare blocking. Once you have modified this configuration file, save and close the file.
Restart Fail2Ban
Restart the Fail2Ban service to apply the changes:
sudo service fail2ban restartTesting the Integration
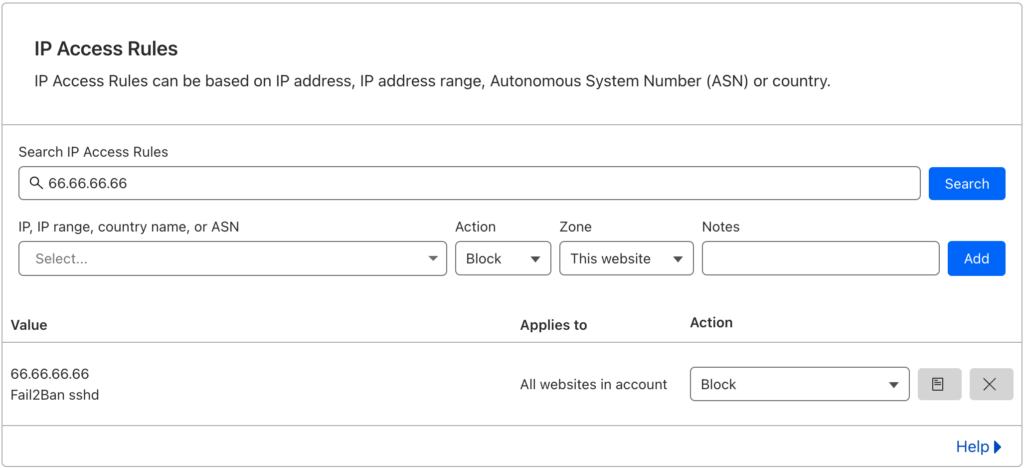
To test the integration, simulate a banned IP address by adding an entry to the Fail2Ban ban list:
sudo fail2ban-client set sshd banip 66.66.66.66Replace 66.66.66.66 with the desired IP address to test.
Upon issuing this command, Fail2Ban will block the IP address 66.66.66.66 by adding it to the iptables firewall. The IP address will also be added to the IP Access Rules area at Cloudflare.
You're done!
If the IP address you just banned is listed in Cloudflare (Cloudflare > Domain > Security > WAF > Tools), then you successfully setup the Cloudflare action script and the configuration is working. You can now add this action to more filters in your jail.local configuration file.
If this did not work, leave us a comment below and we'll do our best to help!
By integrating Cloudflare with Fail2Ban, you can enhance your server's security by blocking malicious traffic at the Cloudflare level. This combination helps mitigate the impact of brute-force attacks and other malicious activities, reducing the load on your server and improving overall performance.
Remember to keep both Cloudflare and Fail2Ban regularly updated to ensure you benefit from the latest security enhancements. Stay proactive in monitoring your server logs and adapt your security measures accordingly.
Implementing this integration is a valuable step toward fortifying your server's defenses and safeguarding your online assets.
Download our 2FA via Email WordPress Plugin
We’ve developed a small, lightweight, and efficient WordPress plugin that does just that; just simply download, install, and sit back and relax!